Using Google’s Archival Cloud Storage for Long Term Backups
I have some large media files that I want to keep forever, and need an off-site copy of, just in case. Home movies, photos, music I’ve accumulated over the years are that I won’t ever delete. I already have various backup strategies, like Time Machine and Backblaze, which are all great for data that changes on a regular basis. This data is immutable - I’m never going to edit those high resolution digital copies of the entire Led Zeppelin collection I bought a few years back. Since I have another copy of them on my home NAS, I shouldn’t need to do a retrieval very often, if ever.
Options & Pricing
Being in the business of cloud, I know that cloud object storage is a great option for these files, except for the price. They look cheap but are always priced in gigabytes per month. I need to store terrabytes. Those extra zeros add up. Here are some of the options and what they end up costing for 10TB on a monthly basis:
| Storage Type | $/GB/Month | Monthly Cost of 10 TB |
|---|---|---|
| AWS S3 Standard | $0.023 | $230 |
| GCP Standard | $0.02 | $200 |
| AWS S3 Infrequent Access | $0.0125 | $125 |
| GCP Nearline | $0.01 | $100 |
| Backblaze B2 | $0.005 | $50 |
| GCP Coldline | $0.004 | $40 |
| GCP Archive | $0.0012 | $12 |
That’s more like it - $12/month for 10TB of storage? Sold. (Note: I work at Google, but pay for GCP, AWS and others with my own $) I excluded AWS Glacier, which was the first true long term cloud storage option for the simple reason that the retrieval process is very annoying and requires making a request then waiting hours until the objects are made available. If I want to grab In the Evening, I’m not waiting till morning. Given the rarity of a retrieval, I don’t factor the retrieval costs of any of these options into the decision.
Now to get the data up there and keep it in sync.
Bucket Setup
There’s one nuance to consider about GCP Archival class storage, and that is when an object is placed in it, if that object is deleted within 1 year it’s charged for the entire year as an “early delete.” Since there is always the opportunity to make a mistake and copy up some files accidentally, that could be costly. To handle this, keep the bucket storage class on Standard and use a lifecycle policy that sets the storage class to Archive only after 3 days. Since a large file transfer may take many days, this value might need to be updated to suite the expected time-line of the copy.
I won’t cover the basics of getting a GCP account set up, or authenticating, and getting the CLI commands in the Google Cloud SDK set up, as there are many places to see that workflow. Let’s jump right into creating our bucket. I’ll call mine “bigbackupbucket” and put it somewhere close by on the west coast. Replace that name, the PROJECT_ID and choose a close-by region. This can all be done via the web console too but that’s no fun at all.
gsutil mb -p PROJECT_ID -c STANDARD -l us-west1 -b on gs://bigbackupbucket
Create a .json file with the following lifecycle policy:
{
  "rule": [
    {
      "action": {
        "storageClass": "ARCHIVE",
        "type": "SetStorageClass"
      },
      "condition": {
        "age": 3,
        "matchesStorageClass": [
          "STANDARD"
        ]
      }
    }
  ]
}
Then apply the policy to the bucket
gsutil lifecycle set ./bigbackupbucket_lifecycle_policy.json gs://bigbackupbucket
Data Transfer
Time to copy some data. The CLI tool, gsutil, has the ability to copy objects in parallel - this is important if you have a fast connection, and I found that about 6 transfers in parallel was the right value for me to achieve good performance (around 800Mbps) but not completely saturate a gigabit connection. I had a better experience running parallel processes than parallel threads, your mileage may vary. It’s perfectly fine to take out the -o options altogether and try it out automatically managed as well. The rsync command synchronizes directories recursively with -r.
gsutil -m -o "GSUtil:parallel_process_count=6" -o "GSUtil:parallel_thread_count=1" rsync -r /files_to_backup gs://dansbigbackupbucket/
To try out the transfer and make sure it’s copying the right files add -n after the -r and that will be in “dry run” mode, listing out what files it would copy but not copying anything. In my case I only want to do additive copies, so I’m not including the -d flag that will delete anything from the target not on the source (because of early deletes, and also in case I get the source directory wrong, I don’t want it going and automatically trying to delete things in the destination).
Monitoring
Despite its low cost, this isn’t free storage, so set up some monitoring to see just how much space is in this new storage bucket. Thanks to Google’s extensive monitoring there are all sorts of metrics available to watch. For the purposes of simple backups, there are 2 main things to monitor:
- Total Bytes
- Bytes by Storage Class
Total Bytes should be obvious, but Bytes by Storage Class is particularly important since there is a 16X difference in cost between the class of storage being uploaded, and the final class after the lifecycle policy takes effect. This is a good way to ensure it’s working - especially if you’re cut & pasting that policy from some random website.
In the GCP Console go to the Monitoring section, and then Dashboards and create a new dashboard, then add a chart. Hit the Query Editor button and use the following query (replace bigbackupbucket with the correct bucket name):
fetch gcs_bucket
| metric 'storage.googleapis.com/storage/total_bytes'
| filter (resource.bucket_name == 'bigbackupbucket')
| group_by 1m, [value_total_bytes_mean: mean(value.total_bytes)]
| every 1m
| group_by [metric.storage_class],
    [value_total_bytes_mean_aggregate: aggregate(value_total_bytes_mean)]
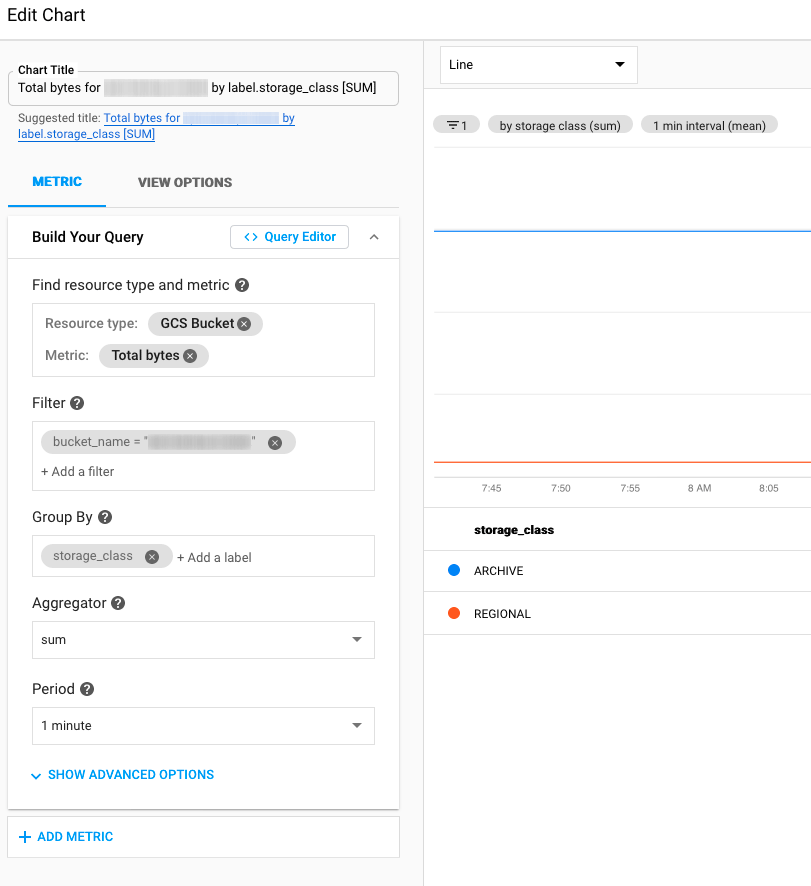
Back in the Edit Chart view, it should look like this (the storage_class legend may not show up if you don’t have any objects in your bucket yet or the bucket isn’t old enough to have statistics generated):

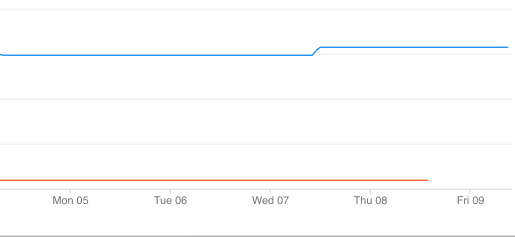
Once the bucket statistics are updated (usually the next day), the dashboard will have a graph showing the amount of storage in the bucket broken down by object class. As objects are added to the bucket they will be under the class “Regional” (which is Standard, just indicating that it’s a single region bucket, not a dual or multi-region). As the objects age to the value of the lifecycle policy settings they will move into Archive and the graph will update accordingly. Keeping an eye on this graph is a good way to ensure the lifecycle policy is set correctly. If objects aren’t moving tiers, then that is the likely culprit.

In this graph, the Archive class is the blue line, and Standard is the orange. After 3 days, as per the policy, the Standard objects are converted into Archive. The Archive object count seems to update ahead of the standard count decreasing, but I verified by listing some objects that everything worked correctly.

