3 Ways To Move Google Authenticator To A New Device
Update 2014-04-12: I’ve moved to a new blog system, and so the comments previously written about this post are long gone. The post is also somewhat out of date, referring to ancient versions of Android, so use caution as I can’t say whether the root shell method still works on newer builds of Android and newer version of the Google Authenticator app.
Update 2013-09-05: The latest build of Google Authenticator for iOS is wiping out previously stored accounts. This got me thinking about how to extract the account keys from iOS, like I’ve done for Android. Take a look.
Update 2012-12-06: As has been mentioned in the comments, there’s now support from Google for attaching 2-step verification to a new device and removing it from the current device. That process should be used going forward, however the info here is still interesting from a historical perspective.
Adding 2-step verification (not sure why they just can’t call it what it is: 2 factor authentication) to Google accounts is one of the smartest things the company has ever done. Anything as central to one’s identity as an e-mail account should be protected with the utmost vigilance. That’s not to say that it’s a) easy, or b) perfect. It isn’t. On the ease of use front - few people other than the most geeky of my friends have bothered to implement it. Two factor authentication is difficult for some people to understand, but most people get along just fine with the RSA tokens issued to them by their work or bank (although they aren’t exactly sporting the best security record this year). The complication for Google comes in the way that they’ve decided to implement per-application passwords. But no matter; this has been reviewed to death. The fact is that 2-step verification adds a TON of security to your Google account, and no matter how difficult it is to use, just use it.
My issue with the system is that there are a couple of traps that are easy to fall into; and the only way out is to go through the process of setting up 2-step verification all over again; loosing any per-application passwords you’ve created (which in my case is a lot). Once you’ve got your barcode or key once to set up a mobile Authenticator app - you can’t get it again. One shot, no do-overs. Need to move your Google Authenticator to a new mobile device? Tough. I find this hugely annoying and would like to save others the wasted time I have spent on a couple of occasions now, starting from scratch. The crux of the issue is that the Google Authenticator app gives you no easy way to retrieve the hidden key, or move it to another device. Changing the device on the Account Security page forces you to remove and re-enable 2-factor authentication. So I’m going to show you 3 ways to move the key yourself.
Method 1 - For the brand new user
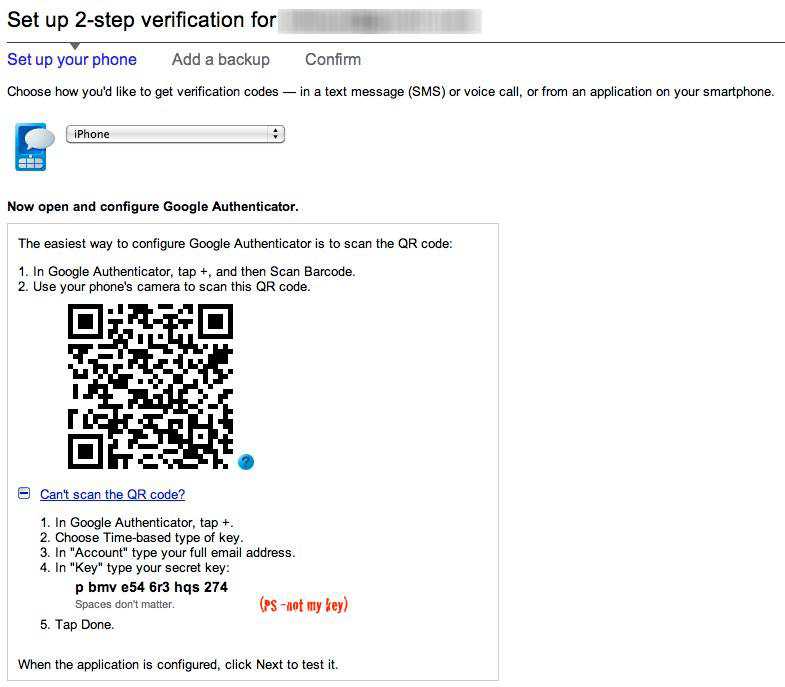
First off, if you’ve never set up Google Authenticator before, here’s a crucial tip - when you are prompted to scan the barcode containing your account key by the Android app - do a screenshot ! Keep that screenshot very safe; you can easily use it to set up a different device in the future. Or if you want - just copy the “Key” that’s listed if you click the + beside “Can’t scan the QR code”. It’s just as good. You’re done; be thankful folks like me have wasted our time blazing the trail so you can walk along it.

Method 2 - For the rooted user (Android only)
If you’re rooted - fear not, Titanium Backup will easily backup and restore the Google Authenticator user data; and along with it let you restore that onto a new device. Potential caveat - if you’re backing up and restoring on totally different versions of Android (say 2.2 to 2.3) this may not work correctly. In which case - go for method 3 below
Method 3 - Manually extracting your key (Android only)
Perhaps you’re not perm-rooted, or you’re moving between major version of Android. The time eventually came for me when I made the mistake of installing Google Authenticator on a device I hadn’t yet rooted - my new HTC Thunderbolt. Due to the instability of ROMs currently available for the Thunderbolt - I decided to stay stock, until the Gingerbread update appeared (which it has not). To my disappointment the rooting methods available for the Thunderbolt all require wiping your entire device by downgrading the firmware to an engineering build. So much for getting Titanium Backup working. In this case - we must fallback to temp-root shell methods Thankfully even most locked down devices are usually able to get a temporary root shell with things like “psneuter” - look it up. That’s all we need!
Step 1
Get a root shell or root adb.
Step 2
Enter the following command:
for adb:
$ adb pull /data/data/com.google.android.apps.authenticator/databases/databases
for root shell:
cp /data/data/com.google.android.apps.authenticator/databases/databases /sdcard/
This will give you the databases file - either locally in the case of adb; or on the sd/external storage partition of your Android device - just copy it locally.
Step 3
The databases file is just an sqlite database. Open that file up with a GUI sqlite editor or the command line sqlite3 program. I’ll assume you’re going the command line route
$ sqlite3 ./databases
sqlite> select * from accounts;
1|user.name@gmail.com|key|0|0
The key column contains your key.
Step 4
Setup Google Authenticator on a new device
Instead of scanning a barcode - add the account manually, with the key you just retrieved in Step 3.
Pat yourself on the back - you’ll never have to deal with setting up 2-step verification from scratch again.


Leave a Comment